

Just last week we had a client bring us a bunch of photographs he'd tried to take of some plaques hanging on his wall. Each one had a bright overexposed orb in the middle, obscuring the lettering on the plaque and making the rest of the plaque appear too dark. This also happens frequently with framed items which, for one reason or another (too fragile or sometimes even glued directly to the glass), cannot be removed from the original frame without damage.
If you do a quick Google search on this subject, you'll find lots of setups that professional photographers use to photograph artwork or other shiny subjects. They usually involve two artificial studio lights, a black mask behind which to put your camera, and even special lighting diffusion "tents." These are all terrific tools for professionals who need to get reproduction-quality shots. But what if you don't have any of that stuff?
You're not going to sell high-quality reproductions of your photo; perhaps you just want to include your photo in a book or share it online. Here are a few tips to get a better shot of something behind glass without all the fancy stuff.
1. Turn off the flash. As you can see in the photo below, my on-camera flash was on and reflecting off the glass.

On-camera flash always leaves a reflection on the glass.

Oops! Now with the flash off, my photo is blurry because of a slow shutter speed. I still have a reflection from a window or something behind me.
But if I leave the photo in the same place on the wall (in our basement studio), there is not enough light to get a sharp shot. I could use a tripod and shoot it at a slower shutter speed, but my photo won't be as sharp and may be a bit grainy. Here's how to solve it:
2. Take it outside. Find a place in the open shade of a building. (A cloudy day is even better!) Prop the photo up or hang it in a place where the sun or bright sky is to one side of your object. Make sure that you have a wall, fence, or other non-reflective surface behind you.
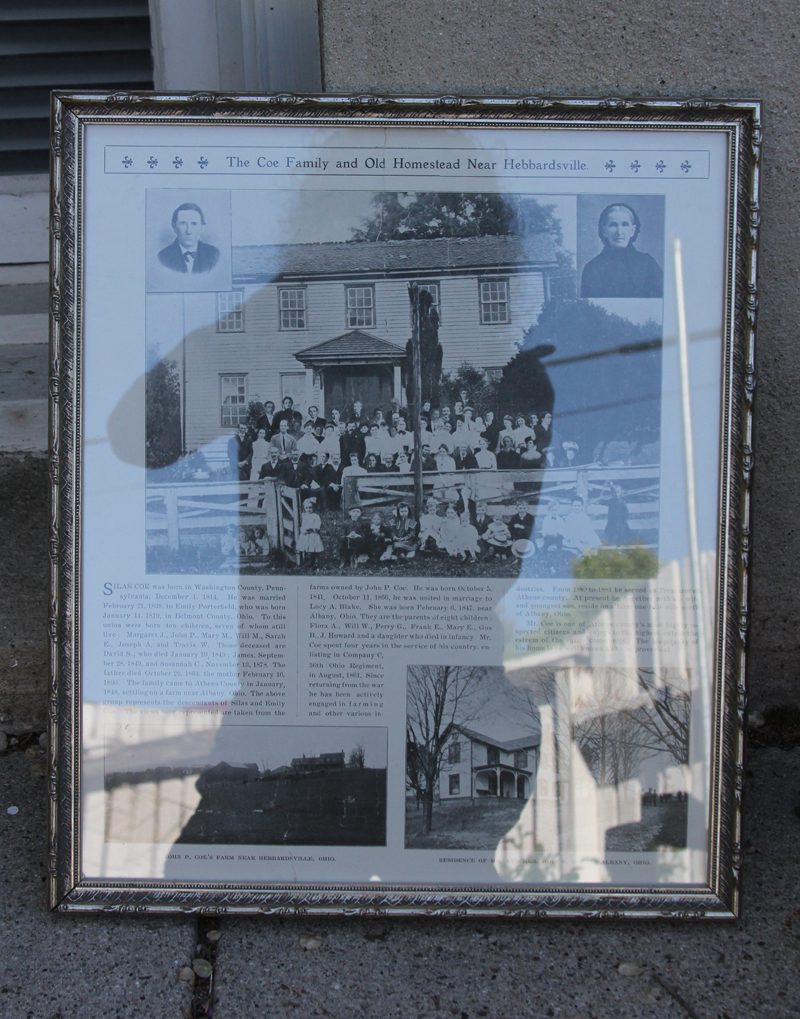
Here I've got some crazy bright reflections of white fence, blue sky, and myself showing up in the photo. I can prevent this by angling the photo so that I have a darker, non-reflective surface behind me.
My first try (above) with the photo leaned up against a wall of the house didn't work. I had a bright white fence and bright sunny sky behind me, which caused some crazy reflections on the glass.
I angled the photo so that the sky was to my left, a white wall to my right, and a dark wood fence behind me, and got a much better result:

It's much better, but I still have some bright reflections up in the corners, where bright sky is showing between tree leaves.

That's better! I held up a piece of white foam board behind my head while I snapped the picture to block out the sky reflections. (I was lucky, in this case, to hold my right hand still enough to get a sharp shot. If you use a tripod or have someone else hold the board, it'll be easier to get an in-focus photo.)
3. Shoot straight on to avoid distortion. And with a telephoto lens if you have one.
In the photos below, the left one was shot a little from the side as I was trying to avoid a reflection. You can see how this has distorted the perspective of the photo. On the right, notice the "barrel distortion," the edges of the frame look curved or bowed. This is what happens when you use a wide angle lens and stand close to the subject. (This is also why your nose looks so big in phone-camera "selfies"...)

Shoot straight on to avoid distortion. Stand away and use a telephoto lens to remove curvature.
To get a straighter frame, stand further away from the photo and zoom in with a telephoto if you have one. (This only works if you're using a "real" camera. Using the optical zoom on a cell phone will give you a lesser-quality image.) Make sure your camera lens is parallel with the glass on the picture -- for instance, if you have the picture against a wall, you will have to "lean" the camera with it until the frame edges line up with the edges of your viewfinder.
4. Check your white balance. Shooting in the shade or on a cloudy day, especially in the winter, can make your photo look too blue. If you have a "white balance" setting on your camera, put it on the setting that is made for clouds or shade. This will warm up your photo. You can also use the auto color feature in Photoshop to correct it later, but it's better to do it in the original shot if you can.

Voila! Much better than my first attempt.
Great! Although this may not be sharp enough to reproduce as a poster or sell as an art print, it's good enough for my purposes, and I didn't have to set up my heavy-duty studio lights. I have a large enough resolution to reproduce in a book and I can even read the newsprint. (To learn more about high-resolution images for print, have a look at this post and this infographic.)