
Here at Pictures and Stories, we focus a lot on how to handle old photographs and use them in a personal or family history. But chances are you're going to include some new photos too. So we thought we'd you give a few basic tips to improve your snaps, whether you are using a fancy SLR or Instagram on your smartphone. Just a few simple changes can make all the difference between "nice" and "WOW." Just in time for your summer vacation!
1. Fill the frame
Zoom in to get a more dramatic photo, whether you're shooting objects or people.

The closer the better.
- What is the most important part of the picture? Make it fill the frame!
- Try using your camera's zoom, or get closer with your smart phone
- Getting close with camera on wide angle will distort facial features and will not be flattering but can be used for comic effect, as in the photo below.

The combination of using a wide angle lens close up and an extreme angle (shooting up from the ground) is used to comic effect.
2. Try different angles
Look high, look low -- see if you can get a more interesting angle than straight-on.

It's okay to look down on your subject.
- Try shooting from below or above the subject for more drama
- Turn the camera vertically for some shots
- For portraits, try shooting from one side

Shooting up from a low angle.
3. Avoid accidental funny hats
Or poles growing out of heads. Watch the background for distracting elements.
Like our new hats?
If the background is too busy, try:
- Getting closer (fill the frame with the subject)
- Changing the angle to remove distracting objects
- Use the Portrait mode on your camera (usually a face icon) to blur out the background

Although this background is rather busy, the photographer blurred it nicely by using a shallow depth of field (you can also use the "portrait" mode on your camera). This puts the focus back on the subject. Photo by Milan Jurek.
4. Lock focus
There is nothing quite as frustrating as a blurry face just behind a perfectly sharp bush in the foreground. Make sure your autofocus is focusing on the right part of the photo.

Beautiful roses--oh, wait, there's a person there! Make sure your focus point is set on the right spot.
- If you are shooting with a "real" camera, put the camera's center focus point on the subject, push the shutter button HALFWAY, and with your finger still on the button, recompose and press all the way to take the picture. Better yet, if your camera allows you to set the focus point other than center, use the point that rests on your subject's face.
- On a smart phone camera, change your settings so that you can press directly on the focus point on the screen before taking the picture.
5. Dead center is dead boring!
When composing a shot, avoid putting the subject directly in the center.
- place subjects & horizon lines along "rule of thirds" grid
- try creating diagonal lines or s-curves in your composition

This photo makes good use of diagonal lines of the fence which point to the subject.

Look for lines to draw the eye to your subject - diagonals and curves are especially effective.
6. Frame your shot
- Include foreground objects to add perspective and create a frame (flowers, tree branches, playground equipment)
- Be careful to focus lock on the subject, not the foreground object

The photo on the top is static in composition. The lower shot uses palms in the foreground and a mountain behind to create a frame for the sailboat, which is attractively placed off-center.

Here, a chain link fence makes a great frame. Just make sure your focus point isn't focusing on the fence.
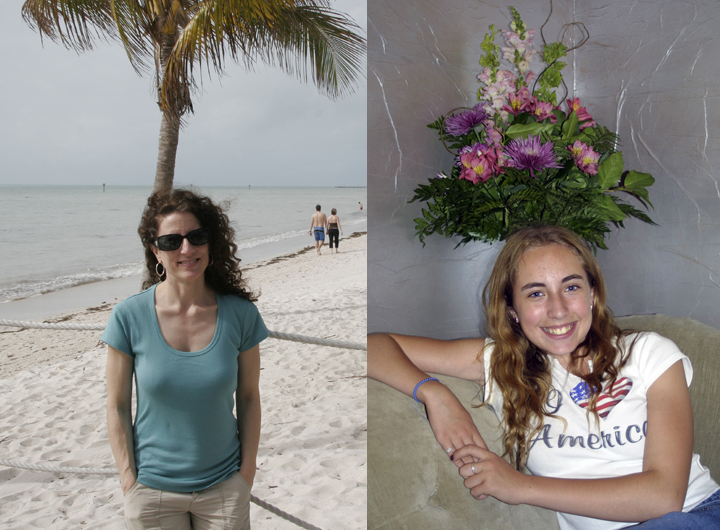
7. Find flattering light

On the left, the subject is squinting into the sun and the shadows are harsh. By moving to the shady side of the building, the light is softer and more flattering.
- Overcast days, open shade (shady side of a building) are softer and more flattering than direct midday sun
- In full sun, use "magic light" at sunrise or sunset
- Practice seeing light and shadows as well as objects and colors
8. Use flash outdoors
Feel free to ignore the old rule about putting the "sun behind the photographer's shoulder" - it just makes people squint! If you put the sun behind your subject or to the side, you can use your flash to fill in the harsh shadows.

Put the sun behind the subject (rather than behind the photographer) and use your flash to fill in the shadows.
- Turn on flash (or fill flash if your camera has it) when shooting in harsh directional sunlight or in deep shade. This will fill in shadows and add a catchlight to the eye.
- Try shooting with sun behind subject or to side if sun is high - and turn on flash for fill.
- When sun is behind the subject, shade your lens to avoid lens flare (use your hand or have someone hold a card nearby, casting a shadow on the camera
- Try "night flash" or "slow synch" mode when you want to include a beautiful sunset, city lights, or the glow from a fire (hold your camera steady or use a tripod!)

Simply changing the angle and moving in closer eliminated all the problems in the left photo (squinty subject, harsh sun, a busy background). Putting the sun behind the subject gives a nice highlight to the hair and eliminates squint.
9. Turn off flash indoors
Think you have to use a flash for indoor photos? Think again! If you do use a flash indoors (especially at night with low ambient light, such as in the wedding below), be sure that you are at a proper distance from your subject. Better yet, point the flash toward the ceiling if you can.

Top: subject is too far away from the camera for the flash to be effective; the foreground elements are lit instead. Middle: too close with the flash! Bottom: just about right. You should be about 6-10 feet from your subject if you are using a flash.
- If you do use flash, know your flash distance (usually 6-10 feet) and make sure your subject is within that distance. If you can point your flash toward the ceiling, even better.
- Try using a higher ISO speed and turn off flash.
- Use "slow synch" mode to capture candlelight, Christmas tree lights (hold camera steady or use a tripod)
- Use window light during the day to light one side of the subject, and use a white wall, posterboard, or curtain on the other side to bounce light into the shadows.

This photo was taken indoors at night in low light using an ISO speed of 1600, without flash. Although there is a more pronounced grain, the light is softer and more flattering.

This photo is lit by only a window. A piece of white posterboard was placed just out of the frame on the right to open up some of the dark shadows.
10. Hold the redeye
Yes, you can "get the red out" in photo editing software, but prevention is better. Here are some things you can do to prevent the zombie apocalyptic look:

Scary.
- Turn on all the room lights. Increasing the ambient light will dilate the pupils and make them less likely to turn red. You can also have the subject look directly at a bright light just before taking the picture.
- Have subjects look at your shoulder or away from the camera instead of directly into the lens
- if you have a red-eye flash feature, use it. This will send out a pre-shutter pulse to narrow pupils. The downside is that this pulse can be mistaken for the flash itself, causing everyone the relax their poses just as the picture is taken. So warn everyone to stay in place until the final flash fires!
11. Bonus tip: hold the coffee!
Sharp photos require a tripod or a steady hand.

Try bracing your body against a tree or wall to steady yourself. Photo courtesy of Canon5Dtips.com
- Brace your elbows against your body if necessary
- Slowly squeeze the shutter button instead of pressing it against the camera
- In lower light, brace the camera on a chair or lean against a wall or tree