

Stacks and stacks of beautiful old Victorian photos...a sight that makes me happier than a witch in a broom factory. Yeah, I'm strange that way, because most people would run screaming in horror. (From the photos, not the brooms...ah, never mind.)
If you are strange like me, and cherish these little cardboard slivers of silver-infused history, you will of course want to display them in some form: in frames, in family history books, decoupage them on the side of a dresser (just saw this on Pinterest yesterday!) But displaying (and especially decoupage-ing) the originals can damage your photos. So scan and re-print we must, in order to let our favorites enjoy some open air and sunshine while their original alter-egos are forever safely banished to dark acid-free prisons.
What to do with those that are already faded? Here's a little Photoshop magic that is quick and easy and works a little better than just using the full-automatic "fix photo" tools.
First of all, make sure you have a decent (high resolution, high quality) scan of your photo! You can always make a smaller copy of the photo for online use, but you want to get out the big pixel guns to create your digital "negative." (For more about this topic, take a look at these posts: How to Scan Photos for Print; The Funnel Method for Scanning Photos.)

Here is my original scan.
First, I'll show you what this scan looks like after applying a simple PS auto-tool: Auto Tone. It looks a little better, but not much.

Not much of a difference using Auto Tone in Photoshop. What to do?
The reason why it doesn't look much better? Partly because of two things: the little white edge from the scanner bed that wasn't cropped out of the scan, and the dark black marks in the lower corners. These bits of extreme bits of black and white "fool" Photoshop into thinking that the contrast of the photo is already good, because there's a little bit of pure white and a little bit of dark black. So it misses everything inbetween (or the "midtones" as we [cough] Photoshop professionals say), leaving Uncle Willie still looking a little wan.
(I named him Uncle Willie because I think this is William Simons, brother of my great-grandmother. [And I love how Katharine Hepburn says "Uncle Willaaaaayyyhhh!!" in the movie The Philadelphia Story. But I digress.] But I'm not sure this is actually Uncle Willie, because NOBODY WROTE ANYTHING ON THE BACK OF THE PHOTO. If you are a member of my family, and you know who this person is, will you please let me know? Thanks!)
Below, I cropped the photo and ran the Auto Tone again. Better still, but not fabulous. And Uncle Willie deserves to be restored to his previous fabulousness.

Cropping the white edges keeps Photoshop's Auto Tone from thinking Uncle Willie's white collar is supposed to be medium gray.
So, you ask, what is the better way? I'm going to show you a secret Photoshop trick, which I had to cough up $250 to learn in one of them fancy Photoshop classes. I'm gonna show you absolutely free, so pay attention.
1. Create a duplicate layer of the photo on top of the background layer. (Ctrl + J on a PC. Mac, you're on your own. Apple + J? Or just use Layer>Duplicate Layer. )
2. Change the blend mode (in the little box just above the new layer) to Multiply. Now flatten the layers together (Ctrl + E or Layer>Flatten layers).
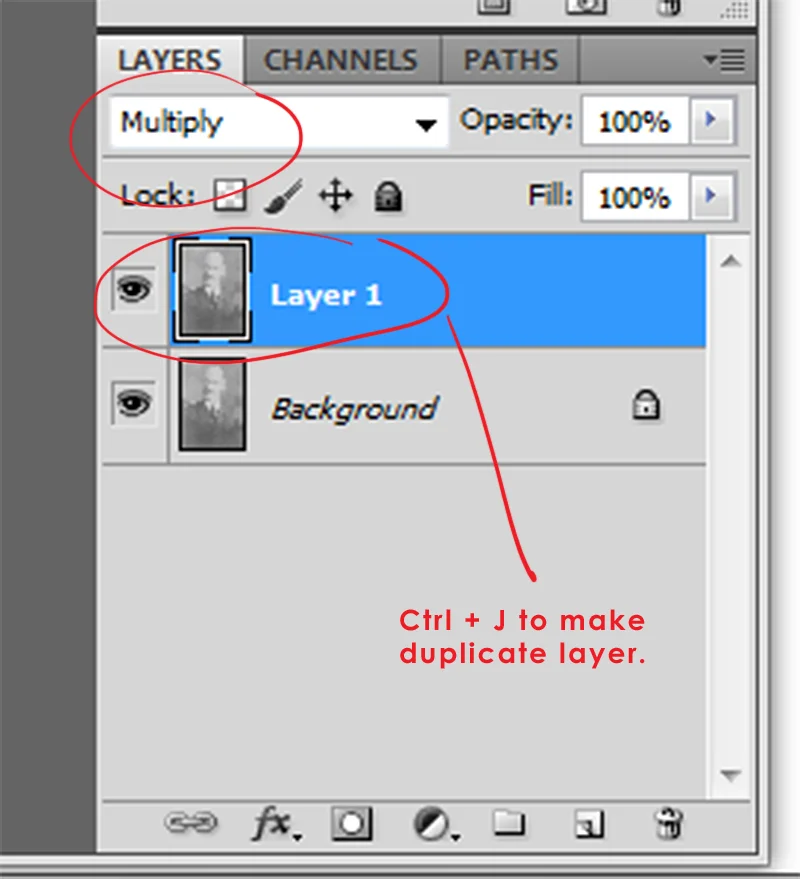
In your Layers palette, add a duplicate layer and change the blend mode to Multiply.
The photo will suddenly get a lot darker, but still won't have the contrast we need. Here's how we're gonna fix it.
3. Next, bring up the Levels palette by pressing Ctrl + L (or Image>Adjustments>Levels).

Use the Levels palette to increase the contrast.
See the three little arrows at the bottom of the mountain-thingy (called a histogram)? These are sliders. The sliders are far away from the sides of the mountain, which means that the photo is low in contrast. We need to click and slide the left (shadow) slider so it's closer to the mountain, and then slide the right (highlight) slider to the left until it's closer to the mountain. What we're aiming for is that the lightest part of the photo (his shirt collar) is white without losing texture or detail.
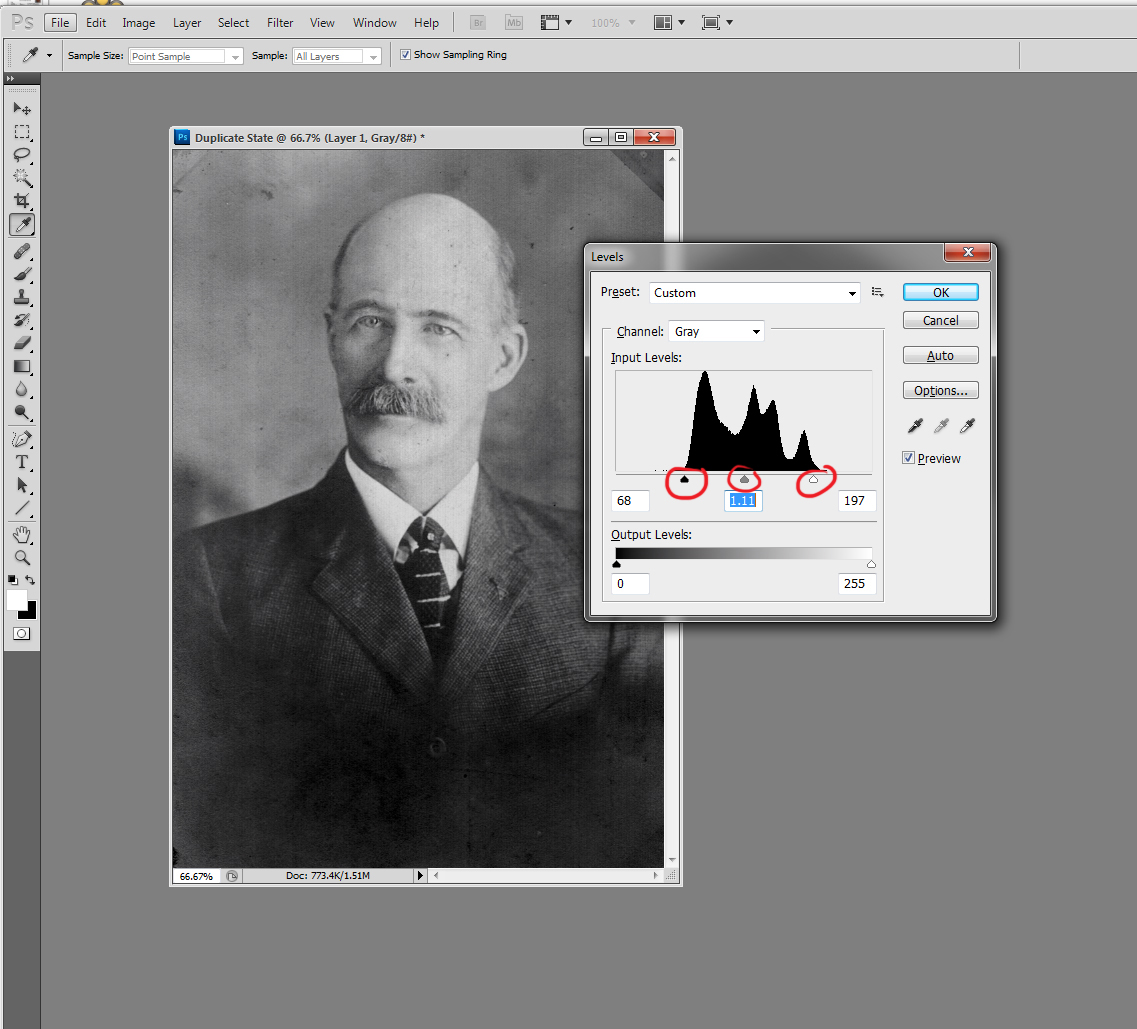
Now the sliders are closer to the edges of the histogram hills, and the contrast is much better.
You can also move the midtones slider if you think the middle tones should be lighter or darker, but most of the time you can leave that one alone.
There! As you can see below, the contrast is much better.
4. Now we just need to de-speckle him a bit. I used the Dust and Scratches filter and then used the Spot Healing Brush to remove some dust and mold spots.

Much better! A little digital botox (the Healing Brush and the Dust and Scratches filter) will spruce him up.
For the final flourish, I'm going to add a dark vignette on the bottom of the photo. This is what the original photographer did, but the effect has faded over time.
5. Create a new layer (Layer>New). Then, on the new layer, choose a large soft round black brush and brush the area at the bottom of the photo.

Grab a big, soft black brush and brush over the area where the original photo was vignetted.
Set the opacity of the vignette layer to 75%, or whatever looks good to you.

Lower the opacity of the vignette layer until you get the result you desire.
Voila! Uncle Willie looks so much happier, non ? And very dashing. In fact, he could just be a candidate for My Daguerreotype Boyfriend, where all the Victorian hotties hang out. What do you think?

Uncle Willie restored to his former glory.